If you are a current Atomic Networks VPS client, you can get started in the VPS panel right away! All you need to do is enter your email from your billing account and your password you set for your VPS in the sign in page.
Method 1: Connect to VPS via. SSH
What is SSH?
SSH (Secure Shell) is a network protocol for secure communication and data sharing between computers. It offers strong authentication methods for safe interaction over open networks. Used by administrators to manage Linux systems remotely, SSH allows logging in, executing commands, and transferring files between computers. It ensures secure communication between a remote host and a local machine.Requirements for Logging into a VPS via. SSH
To connect to a VPS via. SSH, you will need to have the following information:- IP Address
- Username
- Password
If you are an Atomic Networks VPS client, you can find this information in the onboarding email sent to you following purchase. See our guide on getting VPS credentials for more details.
How to Connect to VPS via. SSH
Once you have found your credentials, you will need to have an SSH client on your PC. Click the dropdown below to find your connection method for your operating system.Connect to VPS via. SSH on Windows
Connect to VPS via. SSH on Windows
To connect to a VPS via. SSH with Windows, you will need to download an SSH client. This guide will use PuTTy as the SSH client for Windows users.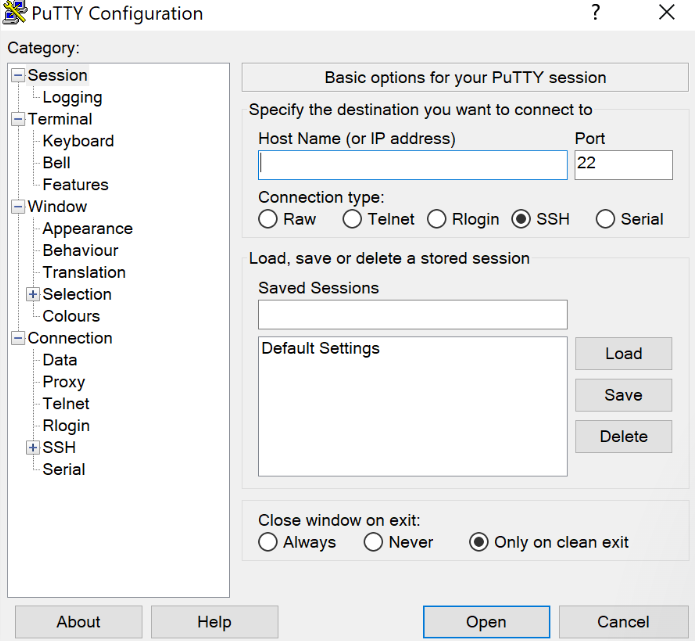
1
Download PuTTy
Download the latest version of PuTTy from the website. Remember to select the correct bit version for your computer.
You can double check your bit version by searching for ‘System Information’ in the Windows search bar and checking the ‘System Type’
2
Launch the PuTTy Client
3
Enter Your Credentials
Using your details, input your SSH password and username. When you enter your password, it will not show you your entered credentials. Note that this is a security measure. PuTTy will still register what you have typed.Congratulations! You have connected to your VPS with the PuTTy SSH client.
Connect to VPS via. SSH on MacOS
Connect to VPS via. SSH on MacOS
Connecting to a VPS through MacOS can be done through the built in Terminal.
1
Open the Terminal
To open the terminal in MacOS, open spotlight by pressing
Cmd + Space and typing Terminal in the search bar.2
Run the SSH Command
In the terminal, enter the command `ssh username@ipaddress’ but replace the following:
- Replace
usernamewith the user name you were provided. - Replace
ipaddresswith the IP Address/Hostname of your server.
3
Press the Enter Key
If it’s the first time you are connecting to this machine, it will warn you that your server key is not cached in the registry. Type
Yes and press Enter.4
Enter Your Password
Enter the password provided to you in your credentials email in the terminal.
For security purposes, your SSH password will not be shown on the screen as you enter it.
Connect to VPS via. SSH on Linux
Connect to VPS via. SSH on Linux
Connecting to a VPS through most Linux distributions can be done through the Terminal. Below are some of the commands needed to install SSH components into popular Linux Distributions.After the components are installed, the SSH service should automatically start. You can check the SSH service status with
If you are unable to establish an SSH connection via. the terminal through your Linux Distribution, follow the steps below to download PuTTy Client.
- For Debian/Ubuntu Based Systems
- For Red-Hat Based Systems (ex. CentOS/Fedora)
Run the following command on the client.
sudo apt install openssh-clientRun the following command on the server.
sudo apt install openssh-serversystemctl status sshdIf the service is not running, use the sudo systemctl start sshd command. This command does not print an output.To set the service to automatically start on boot, run the sudo systemctl enable sshd command.
Note: On some systems, sshd is the service name alias, and the commands will not work. In that case, replace sshd with ssh in the previous commands.
1
Download PuTTy
Download the latest version of PuTTy from the website. Remember to select the correct bit version for your computer.
2
Launch the PuTTy Client
3
Enter Your Credentials
Using your details, input your SSH password and username. When you enter your password, it will not show you your entered credentials. Note that this is a security measure. PuTTy will still register what you have typed.Congratulations! You have connected to your VPS with the PuTTy SSH client.
Method 2: Connect to VPS via. VNC
What is VNC?
VNC, or Virtual Network Computing, is a graphical desktop-sharing system that uses the Remote Frame Buffer (RFB) protocol to remotely control another computer’s desktop environment. It allows a user to view and interact with the graphical desktop of a remote system over a network connection. VNC works by transmitting the graphical display updates from the remote system to the client software running on the local system, and it sends user input events (such as mouse and keyboard actions) back to the remote system. If you are a current Atomic Networks client, you can connect to your VPS via. VNC through the panel at vm.atomicnetworks.co

Requirements for Logging into a VPS via. VNC
To connect to a VPS via. VNC, you will need to have the following information:- IP Address
- Username
- Password
If you are an Atomic Networks VPS client, you can find this information in the onboarding email sent to you following purchase. See our guide on getting VPS credentials for more details.